

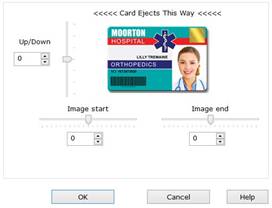
The Image Position options enable the user to make small adjustments to the position of the printed image on the plastic cards - this can be useful for eliminating unwanted white borders. All adjustments are with reference to the card viewed in landscape.
TIP: In the event that the dye-film ribbon breaks due to changes in these settings, it can be repaired with the use of Adhesive Tape; attach the broken ends together and then wind up the black take-up spool by hand for roughly two full turns. Then, before printing again, turn the printer off and back on again and reset the Image Position back to the last know good setting.
Image Start
Default = 0
Slider moved left: the Start of the Image will move left (closer to the start of the card). Slider moved right: the Start of the Image will move right (away from the start of the card).
Note: The adjustment is calibrated to: 10 steps = 0.1mm (approx).
Note: Any movement of the Image Start position will have a corresponding effect on the Image End position.
Image End
Default = 0
Slider moved left: the End of the Image will move left (away from the end of the card). Slider moved right: the End of the Image will move right (closer to the end of the card).
Note: The adjustment is calibrated to: 12 steps =1mm (approx).
Note: The Image Start is unaffected.
Up / Down
Default = 0
Slider moved upwards: the image will move upwards on the card.
Slider moved downwards: the image will move downwards.
Note: The adjustment is calibrated to: 12 steps = 1mm (approx).
Caution: Moving the Image Start slider too far right can result in the image being printed beyond the start of the card – this will cut the dye-film ribbon.